Tutorial: Event Night – Item Pick Up/ Will Call

This is the last tutorial for the night of the event. This tutorial will teach you how to use MyGala’s will call/ item pickup section.

Note: For the event night tutorials, you’ll need to know how to use the admin area to add new guests and add items for your auction. To schedule your MyGala training session, please contact us.

To start item pick up, please follow these steps.

  1. From the MyGala Volunteer Area, Click on Will Call
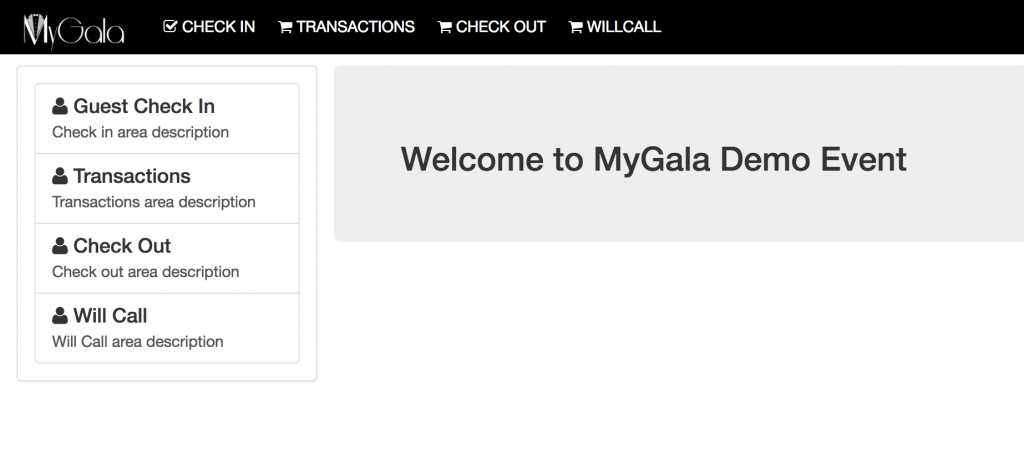
    You can access the Will Call area from the top or left side navigation from the Volunteer area landing page.
  2. Search for the guest
    When you first enter the Will Call area, there will be a drawer open on the right-hand side called “Recently Paid.” You can minimize or re-open the drawer by clicking on the tab with three vertical dots. The recently paid drawer tells you which guests have paid during check out to help you get started. You can also see which items they purchased by clicking the black arrow to the left of the guest name to begin collecting those items.
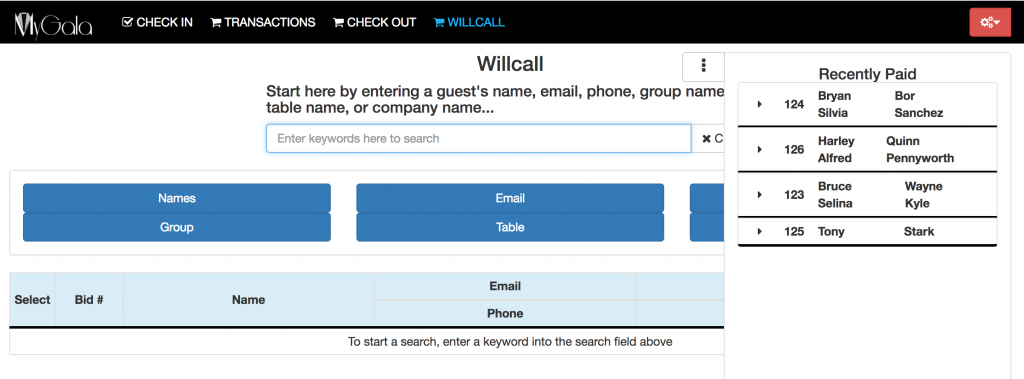
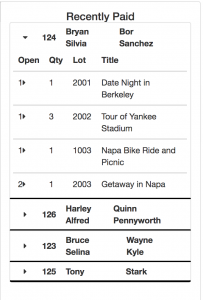
    To start, you should minimize the drawer and then enter the guest’s last name or bid number in the search field. When you find the right guest, click on the green checkmark to view their purchases.
  3. Review items with guests
    When you select your guest, you can view their transactions/ purchases below. On the second column (labeled “Paid”), there will be a check mark if the guest has paid for their items yet. If they have not yet paid, please direct them to check out. If you need to check out the guest yourself, you can access our tutorial here.
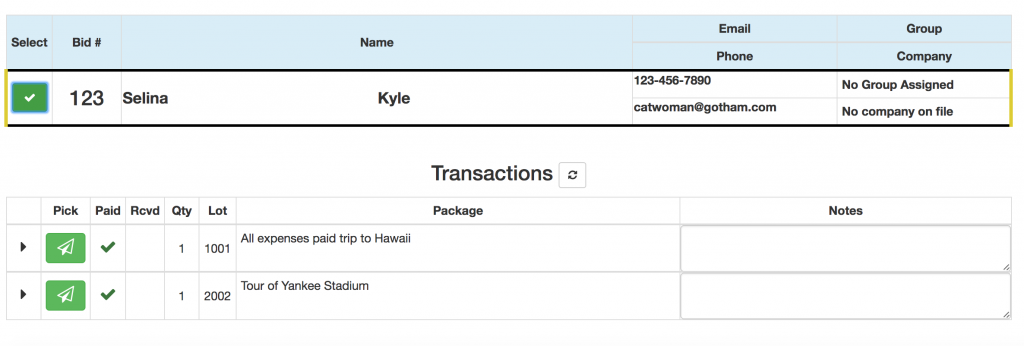
    On the far left is a little black arrow, if you click on the arrow, the transaction will expand to show you which items are included in each transaction (in the example below, lot# 1001 has been expanded to show its contents). For example, if a package consists of a gift card and a physical item, this helps you ensure that guests are not missing any items.
  4. Give items to guests
    To mark an item as picked up, click on the green paper airplane on the left (you will now see a green checkmark on the “Rcvd” column). If you accidentally marked it as picked up, you can click the yellow circle to revert. If you are missing an item or there are any other issues, you can write custom notes on the far right of the item. When you finish writing your note, click the green “save note changes” button.

That is the end of our event night tutorials. We hope you enjoy using MyGala. We look forward to your feedback and invite you to contact us if you have any questions or suggestions. If you missed our last tutorials, be sure to check out Getting Started with MyGalaSetting up your Event Landing PageTicket PurchasesChecking in a guestEntering a Transaction, and Checking out a guest.

Tutorial: Event Night – Guest check out

This is the third tutorial for the night of the event. This tutorial will teach you how to check out a guest on MyGala. For this section, you will need to know how to enter/ edit transactions. Please see our last tutorial.

Note: For the event night tutorials, you’ll need to know how to add new guests and add items for your auction. To schedule your MyGala training session, please contact us.

To start checking out a guest, please follow these steps.

  1. From the MyGala Volunteer Area, Click on Check Out
    You can access the Check out area from the top or left side navigation from the Volunteer area landing page.
  2. Search for the guest
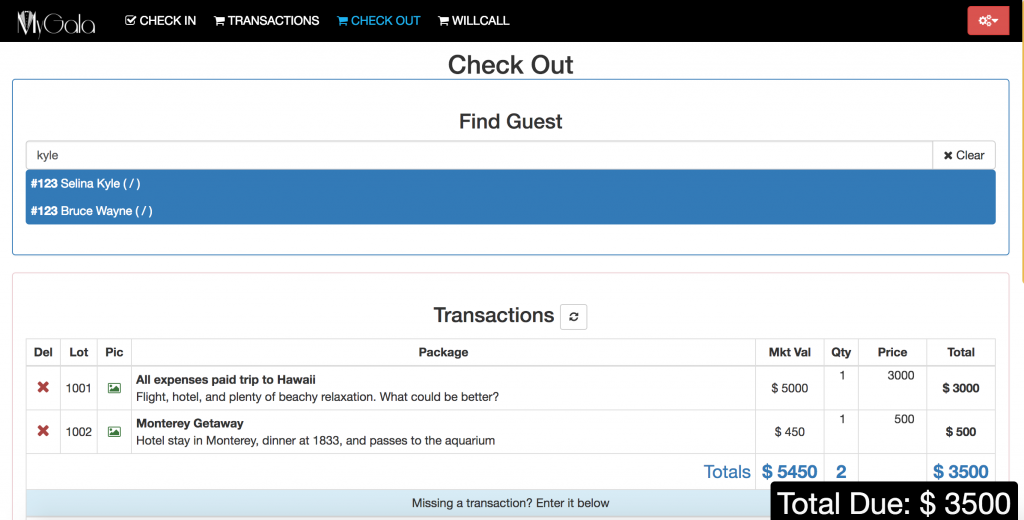
    To start, enter the guest’s bid number or last name in the search field.
    When you select the right guest, the screen will scroll down to their transactions.
  3. Review  and edit transactions
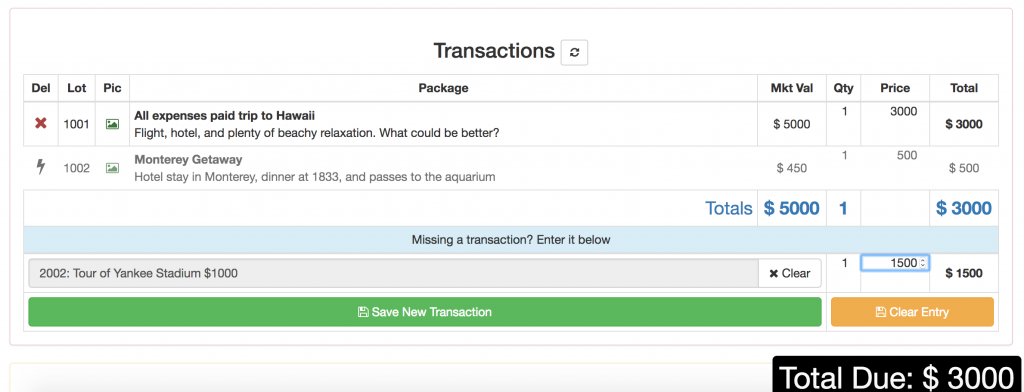
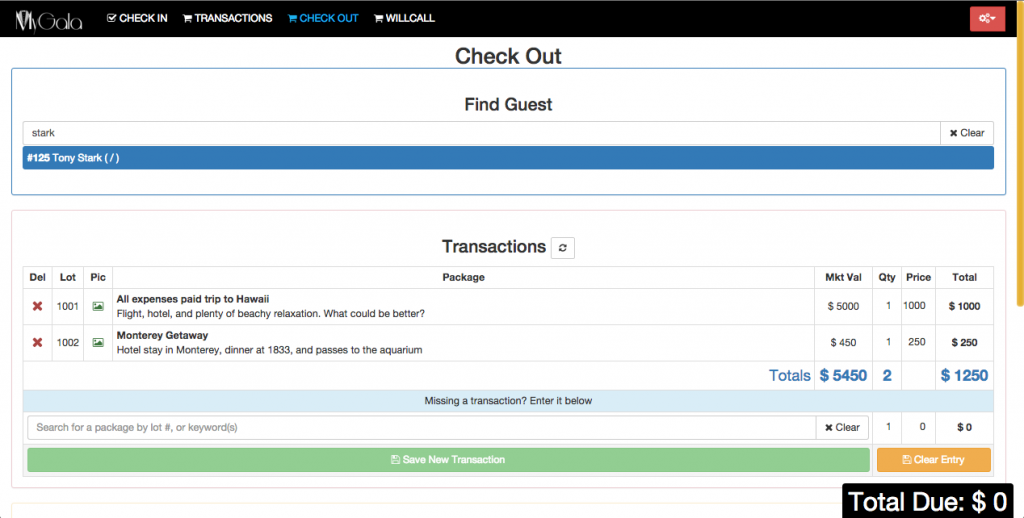
    Review the transactions with the guest to make sure there are no errors. Note: The “Mkt val” column states the fair market value of an item. The “price” column defines the price the customer should pay. An item purchased is only tax deductible for the amount in which the purchase price exceeds the market value. In this example, the purchase is not tax deductible. You can see a customer’s total on the very bottom of the screen as well under the “Total Due” box. If a transaction was entered by mistake, click the red X on the left to delete the transaction. In the example below, the Monterey getaway was deleted. If you deleted the transaction by mistake, click the lightning bolt to revive it.
    To edit any other transaction details, please head to the transactions section and find the appropriate transaction to edit any details (this tutorial can help you edit a transaction). To add missing transactions, you can enter it directly below the transactions list. In this example, we entered a tour of Yankee stadium with a purchase price of $1,500. Click the green save button to add the transaction.
  4. Process payments
    Once your guest confirms the transactions. You can collect payment. You can enter as many payments as you need to reach your total. Simply select the type of payment from the drop-down menu. MyGala will then ask you to enter the last four digits of a credit card, the check number, or the type of cash bills you accept. Then enter the payment amount and click save. If you accidentally entered a transaction, click the red x on the left. If you mistakenly deleted a transaction, click the blue lightning bolt to revive it. Note: MyGala collects payment information to help you reconcile your payments at the end of the night. However, MyGala is not a payment processor, so you will need a credit card machine to accept credit cards.
  5. Send a receipt
    Once your guest is paid in full, you can send your guests an email receipt. Be sure to confirm that you have the right email address on file with your guest. In this example, Selina and Bruce are both missing emails and phone numbers, so the “Send receipt email” button is faded and won’t work without a valid email.

    To edit or add an email address/ phone number, click on the appropriate field and enter in the corresponding information. Click save to save your changes.

    Now that the system has a valid email address, you can press the “Send Receipt Email” button on the left to send your guest their receipt.

We look forward to your feedback and invite you to contact us if you have any questions or suggestions. If you missed our last tutorials, be sure to check out Getting Started with MyGalaSetting up your Event Landing PageTicket PurchasesChecking in a guest, and Entering a Transaction.

Tutorial: Event Night – Entering a Transaction

This is the second tutorial for the night of the event. This tutorial will teach you how to enter a transaction (e.g. a silent or live auction purchase) into MyGala. In case you missed it, our last tutorial reviewed guest check-in.

Note: For the event night tutorials, you’ll need to know how to add new guests and add items for your auction. To schedule your MyGala training session, please contact us.

To start entering auction purchases, please follow these steps.

  1. From the MyGala Volunteer Area, Click on Transactions
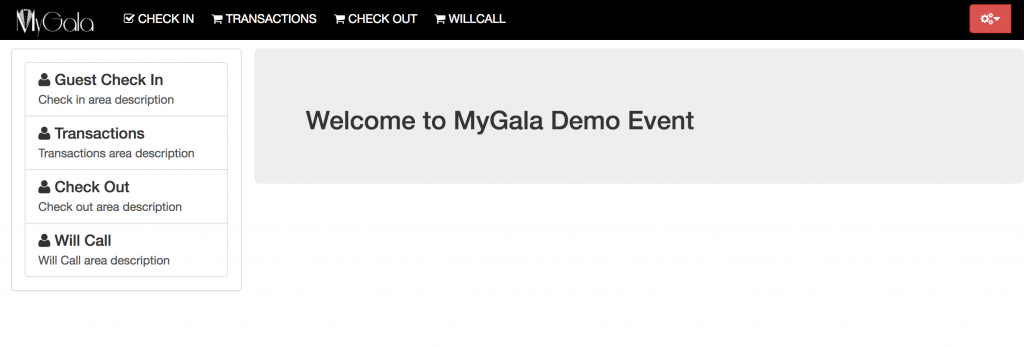
    You can access the Transactions section from the top or left side navigation from the Volunteer area landing page.
  2. Input Transaction Data
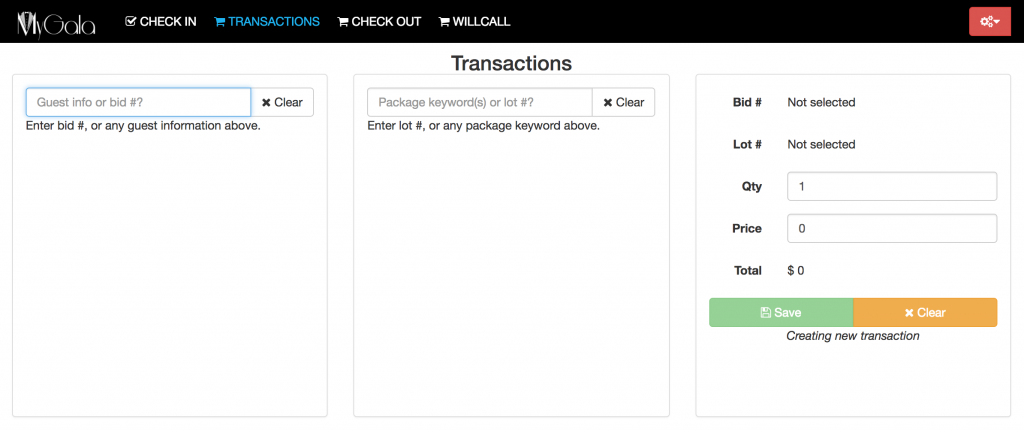
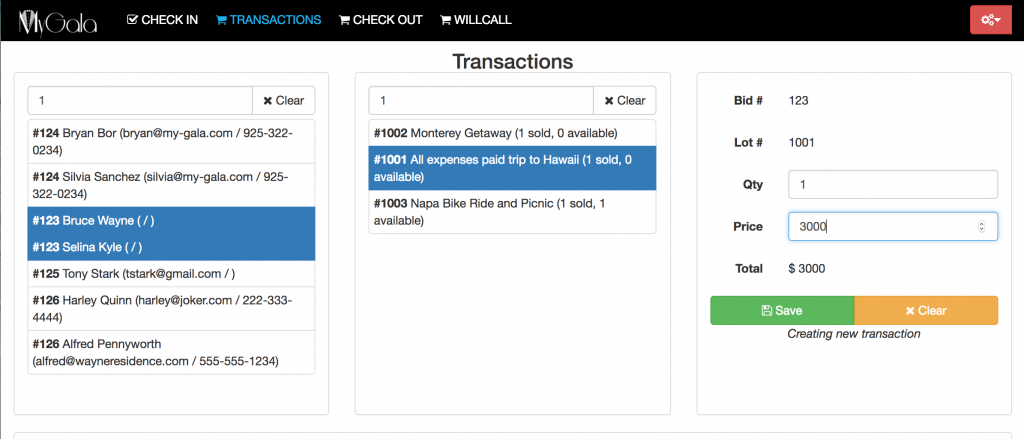
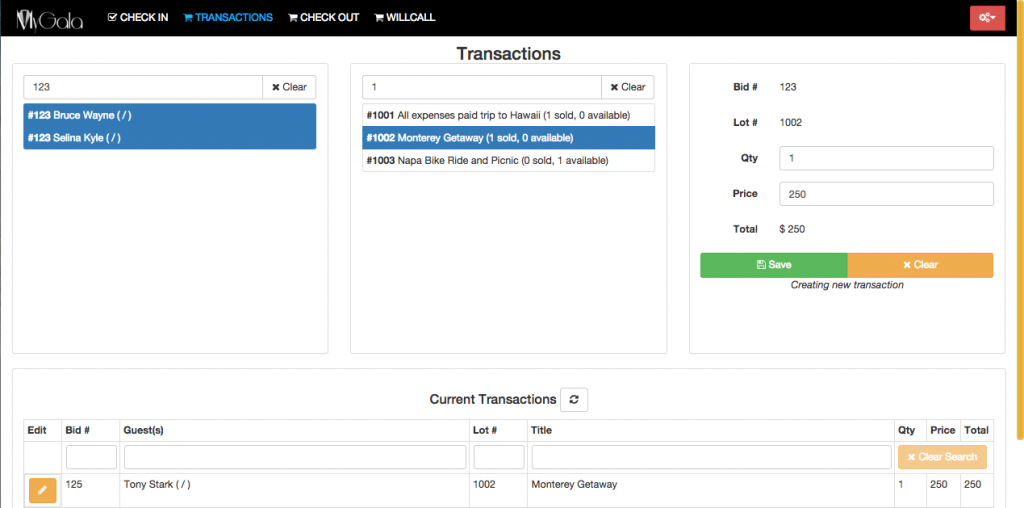
    To enter a transaction, you will need to know who purchased the item (bid number), the item purchased (lot number), the quantity purchased, and the purchase price. You can also search for a customer’s name and the item name if needed. 
    Enter the bid number, lot number, quantity, and purchase price in their respective fields. Select the correct bid number and lot number from the dropdown menu. When you finish, click save.
  3. Review transactions
    When you scroll down, you will see a list of all your transactions entered, starting with the most recent. If you need to search for a specific transaction, you can click on any of the fields and search by bid number, guest name, lot number, item name, purchase price, and quantity. If multiple people are entering transactions, click the button next to “Current Transactions” to refresh the screen.
  4. Editing or Deleting a Transaction
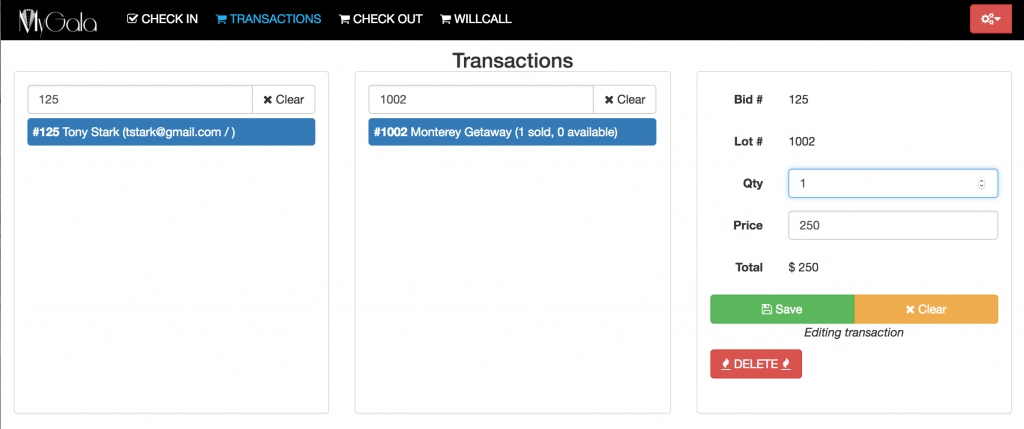
    Once you’ve found the transaction you’re looking for, click the yellow pencil button on the left. The screen will scroll up with the selected transaction details. You can then edit at will. Click Save to save your changes. You can also delete the transaction by clicking on the red delete button.
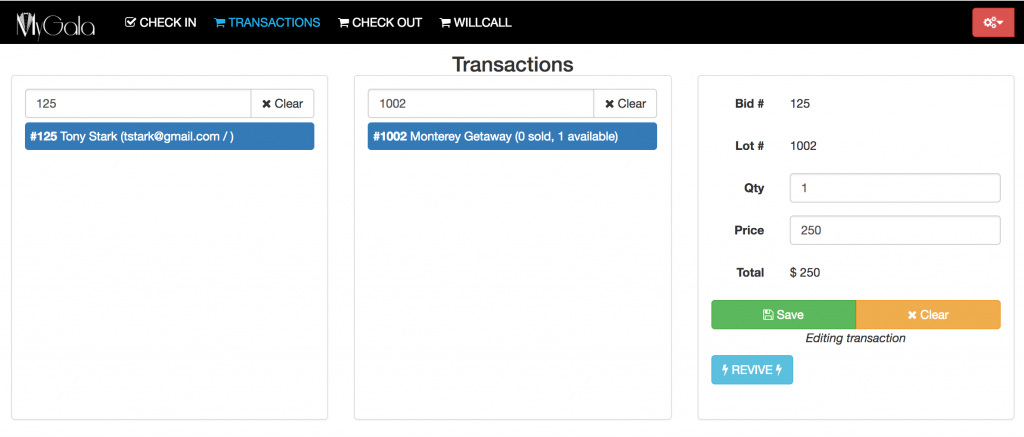
    Note: When you delete a transaction, it will still show in the transaction list in faded text. In the example below, both Tony Stark’s Napa Getaway and Bryan’s Date Night in Berkeley were previously deleted.

    If you deleted the transaction by mistake, simply click on the yellow pencil icon on the left of that transaction. The screen will scroll up to the selected transaction. Click the blue revive button on the bottom right.

Some functions are restricted in the volunteer area. Thus, if there is an error with the item description or lot number, you will need to edit these features in the admin area.

We look forward to your feedback and invite you to contact us if you have any questions or suggestions. If you missed our last tutorials, be sure to check out Getting Started with MyGalaSetting up your Event Landing PageTicket Purchases and Checking in a guest.
Tutorial: Event Night – Checking in a guest

To continue our tutorial series, we’re going to move on to the night of the event. For this series, you’ll need to know how to add new guests and add items for your auction. To schedule your MyGala training session, please contact us. Now, without further ado, here are the steps.

  1. Go to the MyGala volunteer area
    You can access the MyGala volunteer area in two ways. If you’re on your event landing page, click on the bottom right corner where it says: “Show admin links” and click on “Volunteer area”
    If you’re on the admin page, click on the red button in the top right corner and click “Open Event Landing Page”
  2. Go to the Check-in area
    From the volunteer landing page, click on “Guest check-in” on the left menu or “check-in” from the top navigation menu.
  3. Search for a guest
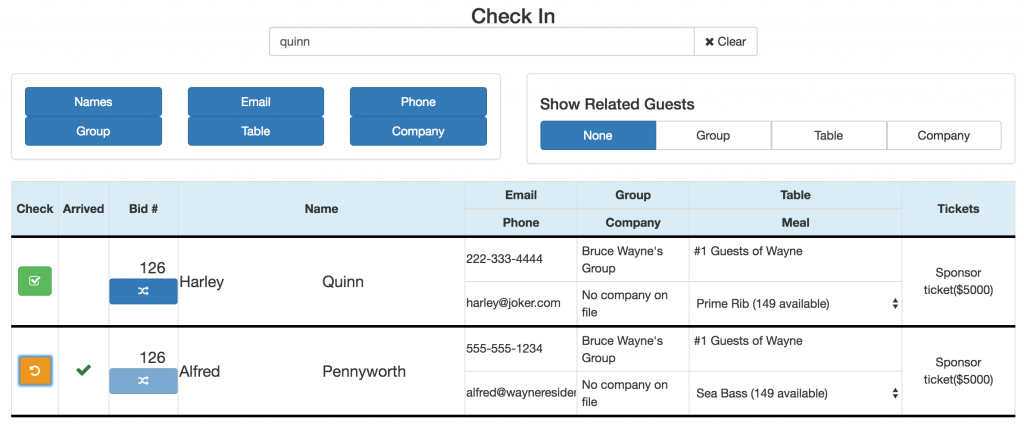
    The check-in area lets your search for a guest directly by name, phone number, email, or company name. Note: you will receive multiple results if your guest is part of a group. The groups function will be explained in depth during your training session. In this example, we searched for Harley Quinn by typing in her last name. Her date happens to be Alfred Pennyworth and they share a bid number, so whenever you search for Harley, Alfred will automatically pop up. You can show related guests by selecting the group (she belongs to Bruce Wayne’s group), table (she is seated at the “Guests of Wayne” table), or company (she does not have a company listed) buttons in the “Show related guests” section.Please note that for some guests, your results may include multiple pages. You can filter your results by deselecting any of the contact details on the left. For example, if you want to search by email only, deselect the other buttons. If they have been assigned to a particular table, you will be able to see all the guests seated at their table.
  4. Check-in guests
    Once you’ve found your guest(s), look at the column that says “Check” on the far left. If the guest has a green checkbox in that column (like Harley Quinn above), they are ready to be checked in. If a guest has a yellow arrow and a check mark on the “Arrived” column (like Alfred Pennyworth above), that means the guest has already been checked in. To check in a guest, simply click on the green button and they will be marked as arrived. If you accidentally checked someone in, simply click on the yellow arrow to un-check them in. You can check-in all guests in a group at one time. When you’re done with the guests in a particular group, click the “clear” button to the right of the search box and you’re ready to check in a new guest.
  5. Editing Guest Details
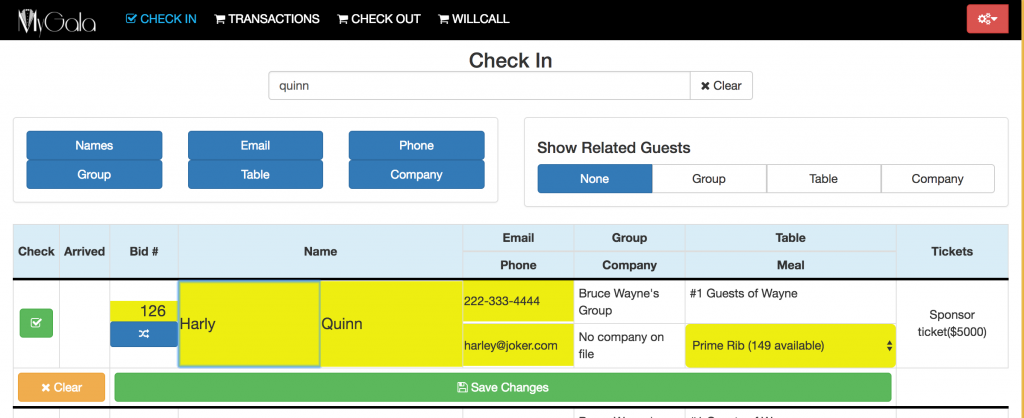
    Before you check in a guest, make sure to confirm their contact details are correct – especially their email address and phone number. We ask for email addresses because that is how a guest receives a receipt for purchases at the end of the evening. A phone number is good to have in case someone leaves without paying their bill or leaves their items. MyGala will never disclose these contact details to a third party. Lastly, the system will not allow you to check in a guest if they do not have a bid number. You can click on the blue double arrow button to assign a new bid number if that field is blank, or you can manually edit the number. The fields highlighted in yellow below are the fields you can edit during check-in. To edit any of these fields, simply click on the box and type in the changes, then click save changes. Other fields, such as changing a guest’s table assignment must be done in the admin area.

And that is how you check in a guest. As mentioned previously, there are some functions that are restricted in the volunteer area. For example, if a guest wants to register at the door, you can only add a new guest within the admin area. Likewise, if a guest wants to change tables, you will need to do so in the admin area.
We look forward to your feedback and invite you to contact us if you have any questions or suggestions. If you missed our last tutorials, be sure to check out Getting Started with MyGalaSetting up your Event Landing Page, and Ticket Purchases.

Guests can purchase tickets directly from the event landing page. The new in-app system is included in your MyGala package with no additional fees (except for Paypal fees-- there's nothing we can do about that!).

Tutorial: Ticket Purchases from A to Z

If you missed the last two tutorials, check them out here: Getting Started With MyGala and Building Your Event Landing Page. For this next tutorial, we’re going to tackle the ticket purchase process as a reference for our non-profit customers.

  1. Add tickets to your event
    You can add new tickets to your event via the MyGala admin area. Simply go to the Event tab and click on Tickets. We go over this step in detail on our Getting Started With MyGala tutorial.Screen Shot 2015-12-14 at 5.34.33 PM
  2. Add a ticket sales section to your event landing page
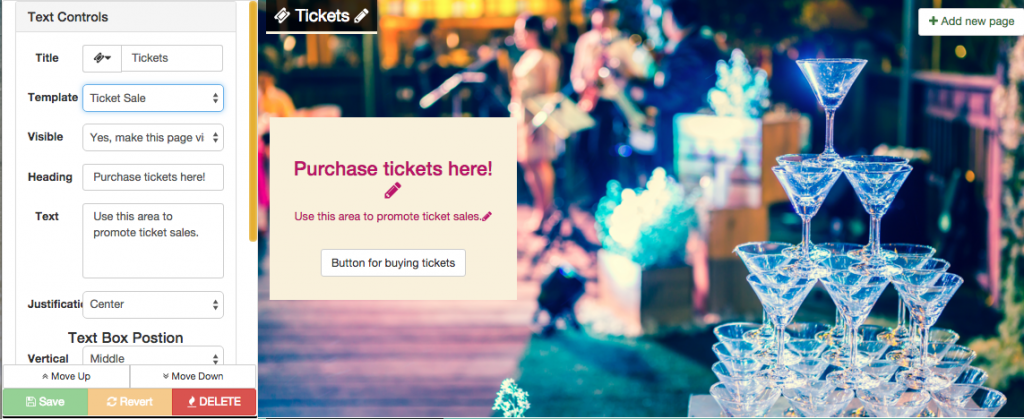
    After you’ve created your event landing page, be sure to add a ticket sales section to your landing page using the “Ticket Sale” template. Note: You will need to sign up for a Paypal account to receive payments for your tickets. Please read our Event Landing Page tutorial to get in-depth instructions.Screen Shot 2016-01-01 at 12.53.24 PM
  3. Market Your Event Landing Page and Sell Tickets
    Market your event landing page on all your event collateral to encourage online ticket sales. You can post the link on your event invitations, email marketing templates, flyers, etc. Once you’ve gotten the word out about your event, you can watch the ticket sales come in.
  4. Visit the Ticket Purchases area
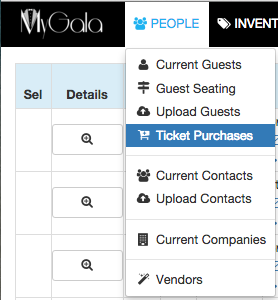
    Once you’ve begun collecting ticket sales, you can review all purchases via the Ticket Purchases area. Simply go to the “People” tab within the MyGala admin area and click on ‘Ticket Purchases.”
    Ticket PurchasesEach ticket purchase will look as follows. The Details button (magnifying glass with the plus sign) will open up any ticket purchase so you can edit details. You will either see a thumbs up or thumbs down icon under the Paid column to indicate whether the purchase was paid for or not. When the ticket purchase is ready for approval, you will see a green check mark, otherwise it will have nothing. The Attention column will indicate how many items in the ticket purchase need your attention. The Buyer column provides all of the Buyer’s contact information. The Tickets column specifies the number and types of tickets sold. The Guest information column will display the person assigned to each ticket type. Lastly, the Connected Contacts column shows you how many guests were previously added to your Contacts list. If you are a new user, most likely 0% of your ticket purchases will have a previous record in your Contacts list.Screen Shot 2016-01-03 at 10.57.28 AM
  5. Confirm Information
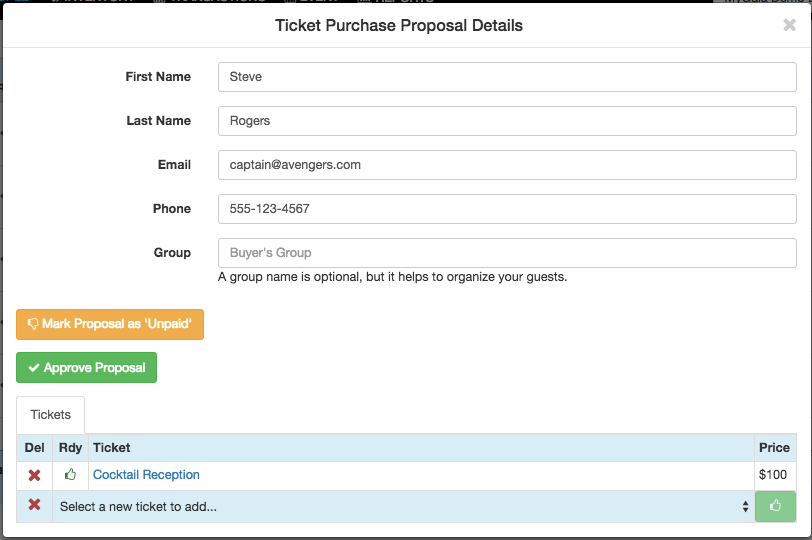
    Click on the “Details” button to open up a ticket purchase.From this screen, review all the information provided. You can mark a purchase as “Unpaid” if it was marked “Paid” in error. If everything looks correct, you can approve the purchase by clicking on the green “Approve Proposal” button.
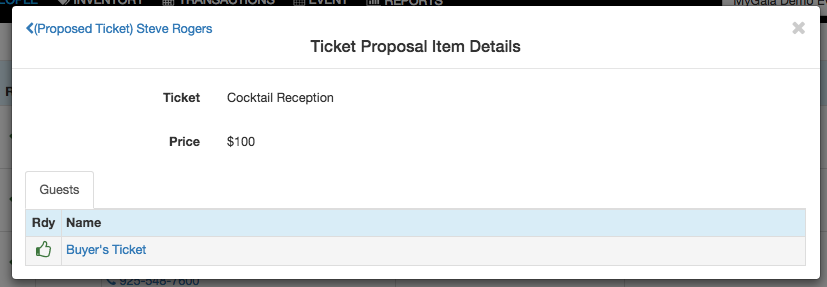
    Screen Shot 2016-01-03 at 11.07.09 AMYou can also review individual tickets from the bottom “Tickets” area by clicking on the link. For example, on this purchase, you would click on “Cocktail Reception” to open up the ticket.
    Screen Shot 2016-01-03 at 11.10.01 AMConfirm guest information, payment, and create a new contact for each ticket or link with an existing contact
  6. Approve the ticket purchase
    Approve the purchase and send a confirmation email to your guests.

New contacts have been added to your guest list. Congratulations, you just confirmed a ticket purchase.

We are constantly adding new templates and user controls to your MyGala event landing page to help make this page exactly what you want. We look forward to your feedback and invite you to contact us if you have any questions or suggestions. If you missed our last tutorials, be sure to check out Getting Started with MyGala and Setting up your Event Landing Page.

Event landing page set-up

Tutorial: Event Landing Page from A to Z

For this tutorial, we’re going to give you an in-depth guide to setting up your event landing page after you’ve purchased MyGala for your event. The event landing page is your one-stop shop to market your event, provide crucial information for event guests, sell event tickets, solicit auction donations, and highlight your auction packages and event sponsors.

We’ve made your event landing page customizable so that it can reflect your organization’s brand and your event’s look and feel. Each section of your event landing page is designed to be mobile-friendly, and visually appealing. You can view a sample event page here at MyGala’s Demo Event landing page.

Note: All of our MyGala packages include training sessions for your organizational users and volunteers, but this tutorial can help supplement your training or help you get started. We want to help you succeed, so please contact us with any questions or to schedule your training session!

  1. Complete the steps listed in Getting Started with MyGala tutorial
    In case you missed it, be sure to read our Getting Started with MyGala tutorial where we talk about how to do preliminary tasks on MyGala.
  2. Some Basic Tools on Your Event Landing Page
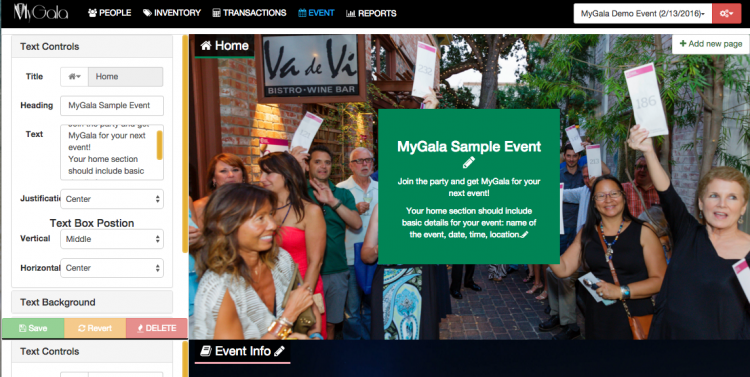
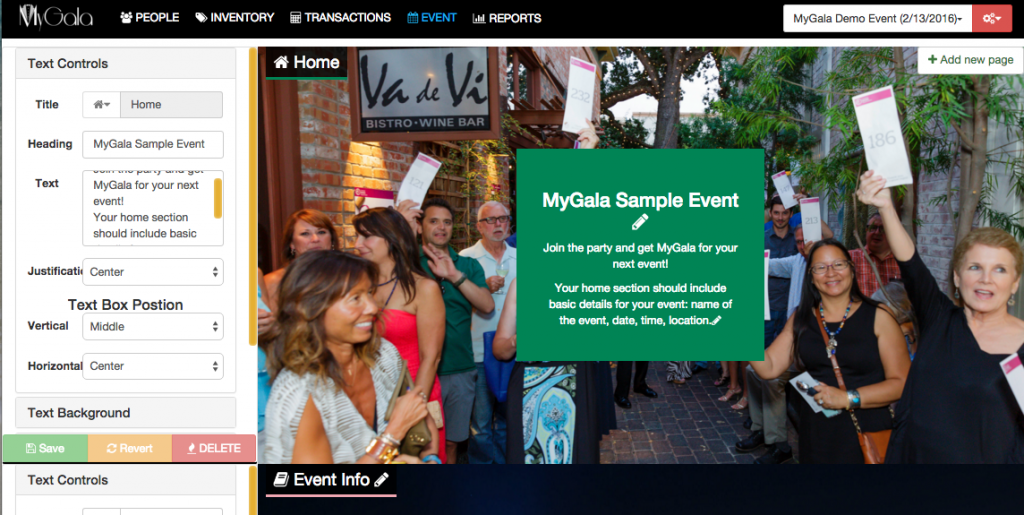
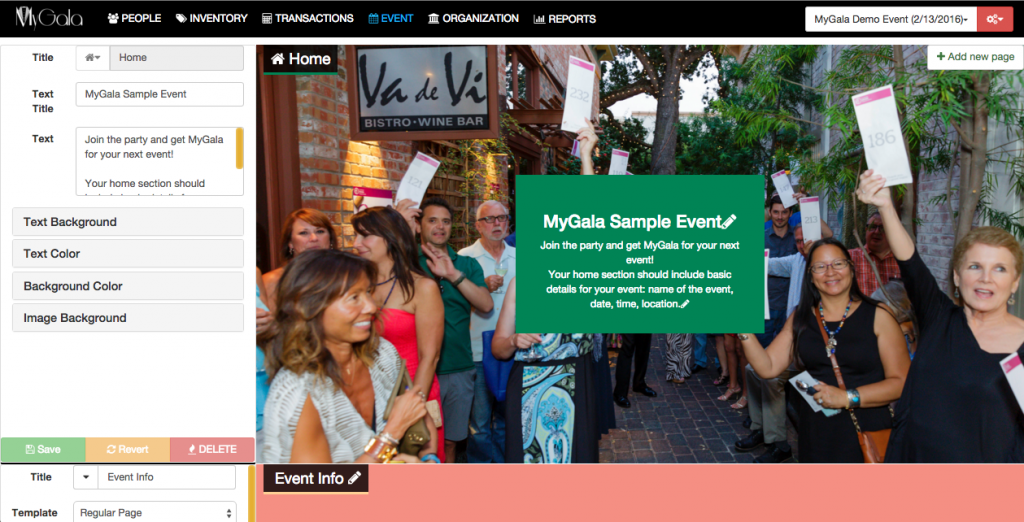
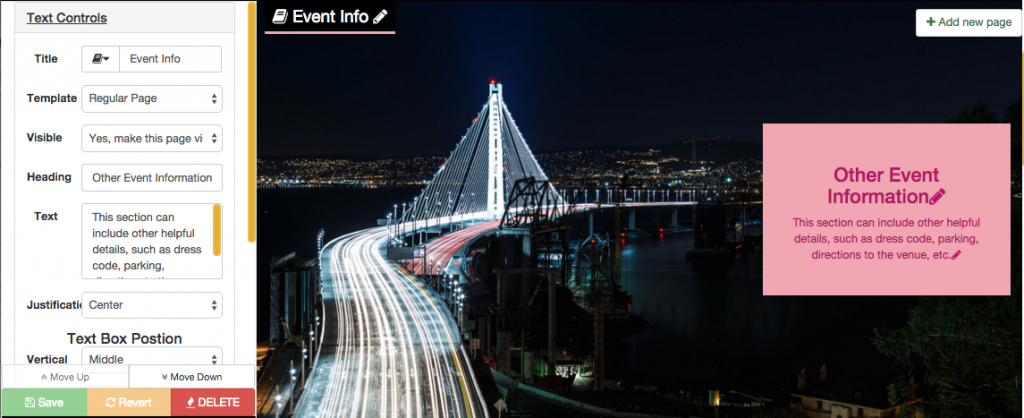
    To begin editing your landing page, head to the MyGala admin area. Hover over the “Event” tab and then click on “Landing Pages.” You will see the following page editor, with the editing tools located on the left and a live preview on the right.When you have completed any changes on a particular section, click “Save” to avoid losing any changes.
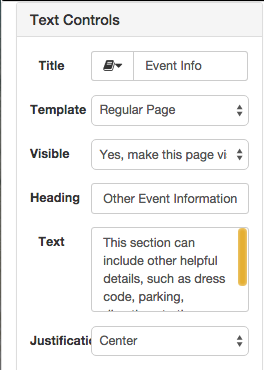
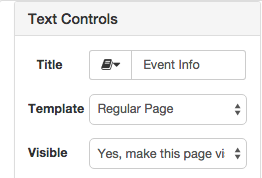
    Event landing page set-upAdding text – Each section has 2-3 text boxes. For every section, except home, you can edit the title of the section (on the area named “Title”) and select a custom icon for the section from the dropdown menu. You can also create your own custom heading (e.g. Other Event Information) and edit the text inside the text box. You can also pick how you would like your text aligned (left, center, or right) using the dropdown menu labeled “Justification.”
    Editing text on the event landing pageUploading a picture background –

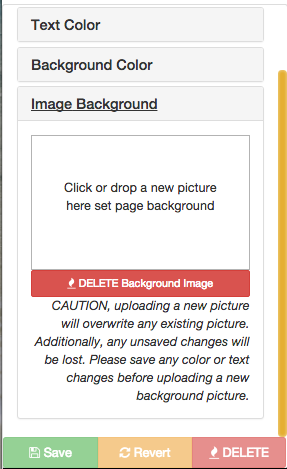
    From the section editor on the left, click on the “Image Background” section. **Make sure to save any other changes you have done to a particular section prior to uploading a picture background.** From there, you can drag and drop an image into the box or click on the box to upload a new image. We recommend uploading an image that is at least 1200×600 pixels to get the best image resolution on your event landing page. If you would like to change the image selected, simply repeat the following steps. If you would like to use a color background instead, click on “Delete background image” and select a background color from the “Background Color” section.
    Screen Shot 2016-01-01 at 12.08.41 PM 

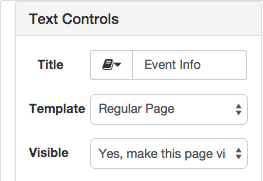
    Making Each Section Visible/ Invisible – MyGala allows you to create a new section that is invisible to the public. From the dropdown menu that says “Visible,” you can select whether to make it publicly visible or not. You may want to use this feature when you are in the process of editing that section. We also recommend using this feature on your auction preview section. Because the auction preview displays all available auction packages, you may want to hide this section until you have items available to preview.
    Visibility

    Add a New Section – 
    Simply click on “+ Add a new Section” at the top right of your page to create a new section of your event landing page. 
    Screen Shot 2016-01-01 at 12.53.24 PM
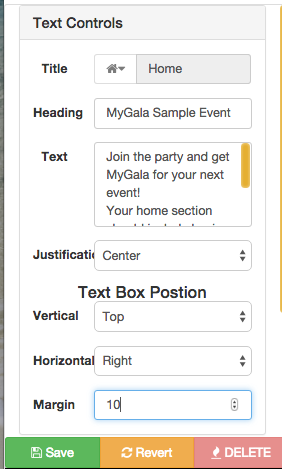
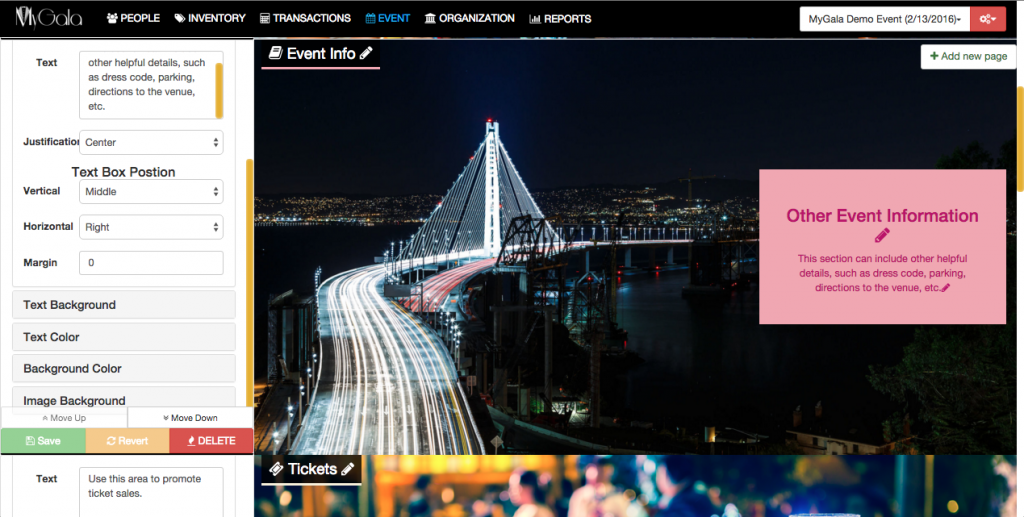
    How to Move Your Text Box – MyGala also lets you move the position of the text box horizontally or vertically. You can do this from the Text Controls area. Under “Text Box Position,” you can choose vertical positioning, either top, middle, or bottom. You can also select horizontal positioning, either left, center, or right. If you select either left or right, you can modify how far to each side it is using the “Margin” feature. For example, we selected “Right” with a margin of 10%. Thus, the text box will display 10% of the total page size away from the right side. We recommend this feature to better display a particular portion of your background image.
    Screen Shot 2016-01-01 at 12.25.49 PM

  3. Event Landing Page Templates
    MyGala provides different templates for your event landing page as described below. To select a new template, select one of the options from the “Templates” dropdown menu under the “Text Controls” section. The following descriptions will help you choose the appropriate template for each section.
    **Note: Each template, except for “Regular Page,” can only be used once.**
    Editing text on the event landing page

    Home Page –
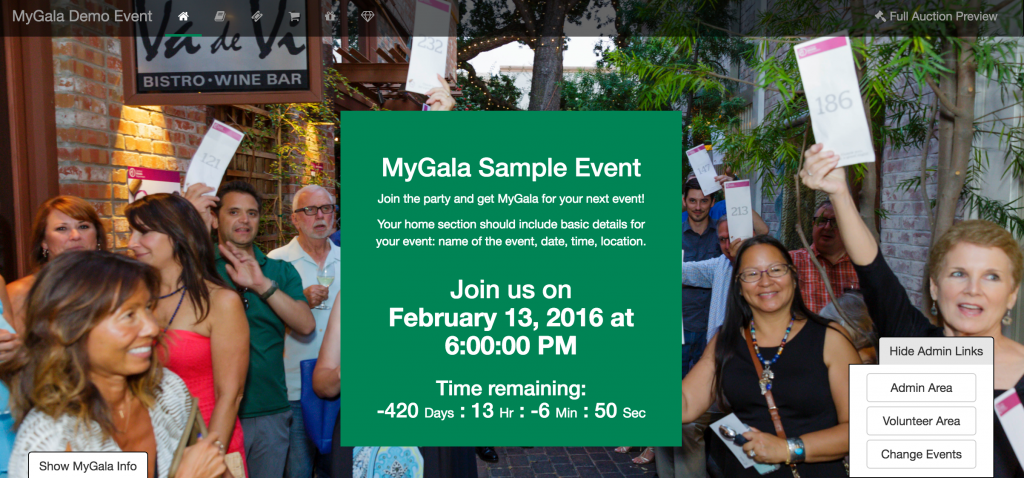
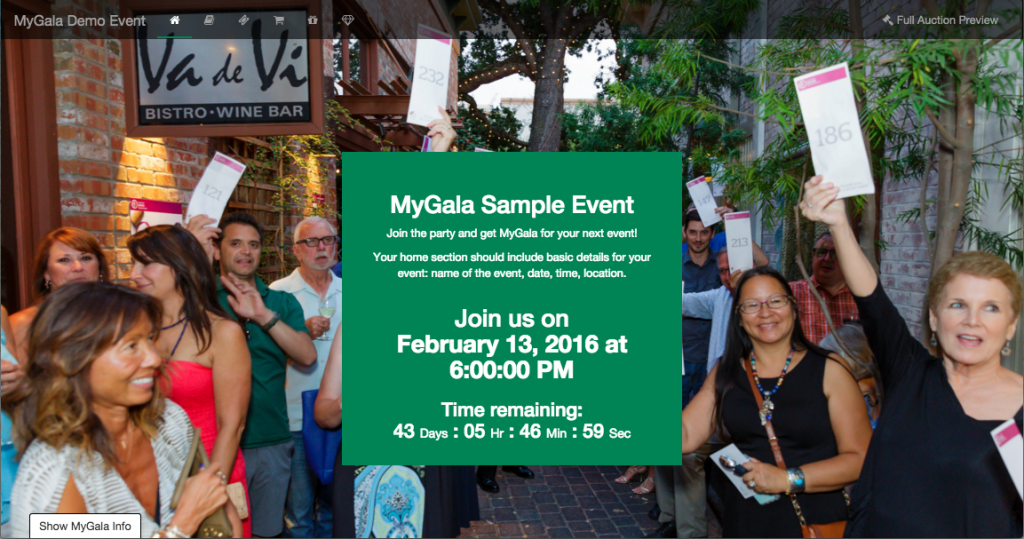
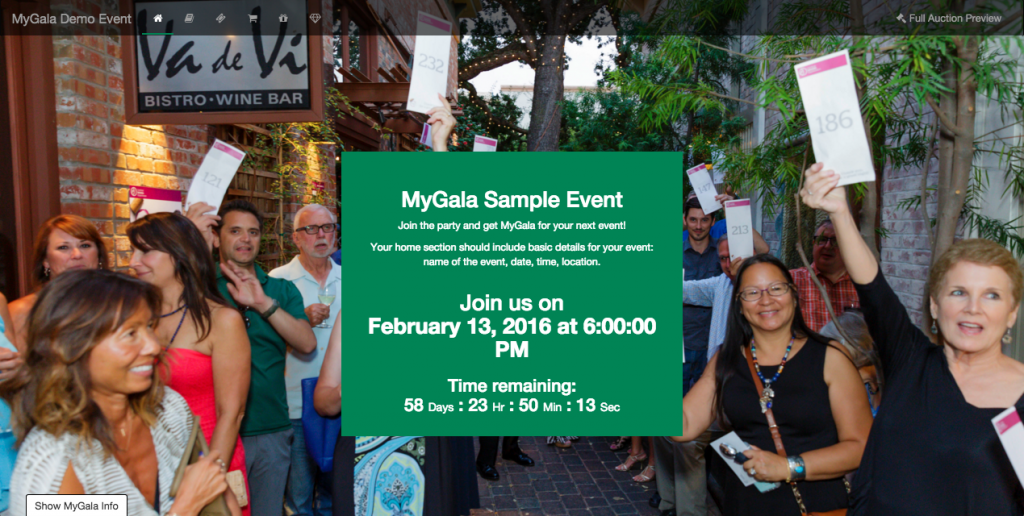
    The home page is your main event landing page section. It is always visible and will contain the date and time of your event. As seen below, all the text below “Join us on” is already included in this section. We recommend adding the name of your event, the location, and any other basic information guests may need to the editable portion of your text box.
    Event Landing Page Home Section 

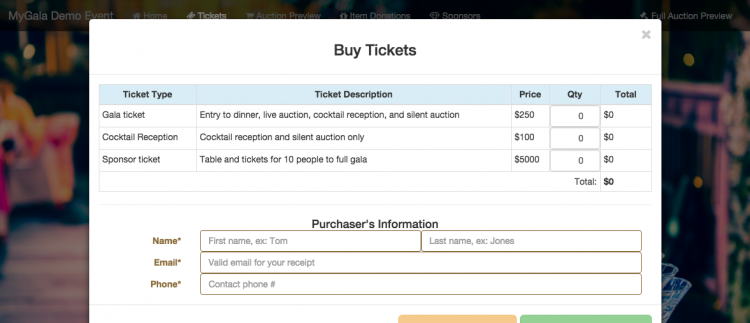
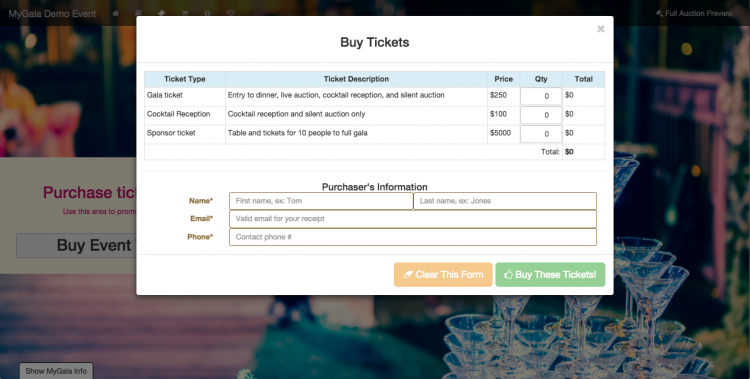
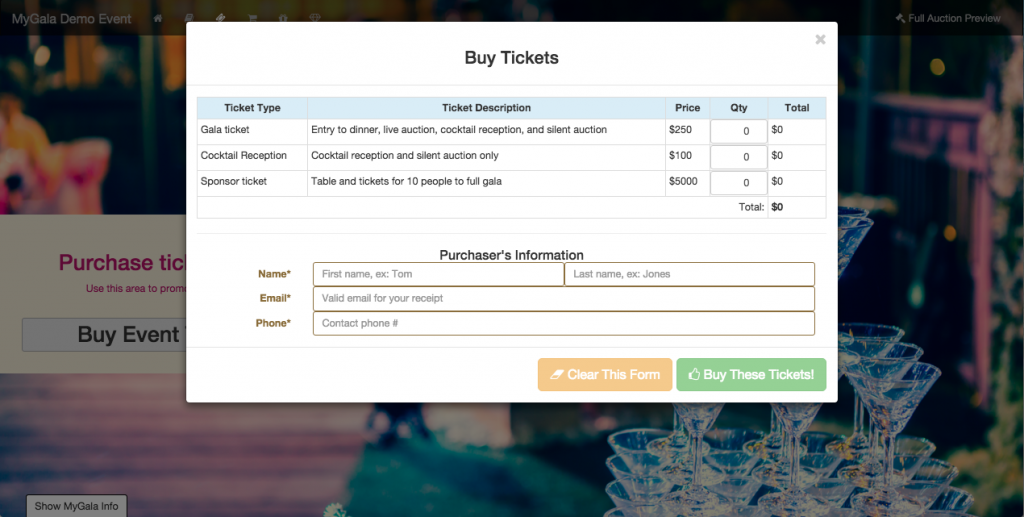
    Ticket Sale – this section allows you to sell tickets from your landing page. MyGala provides this feature at no extra charge from MyGala to you. To use this feature, your organization will need to set-up a Paypal account to accept ticket payments (all purchases are subject to a Paypal processing fee). You will also need to set up event tickets and edit the ticket purchase email template on your admin page. When you select this template, we will automatically add a button that allows guests to select the ticket they would like to purchase, fill out their information, and pay for their tickets. After purchasing their ticket, they will receive a confirmation email. Remember to add a title, select an icon, and add custom text to the page to encourage ticket purchases.
    Screen Shot 2016-01-01 at 12.53.24 PM 

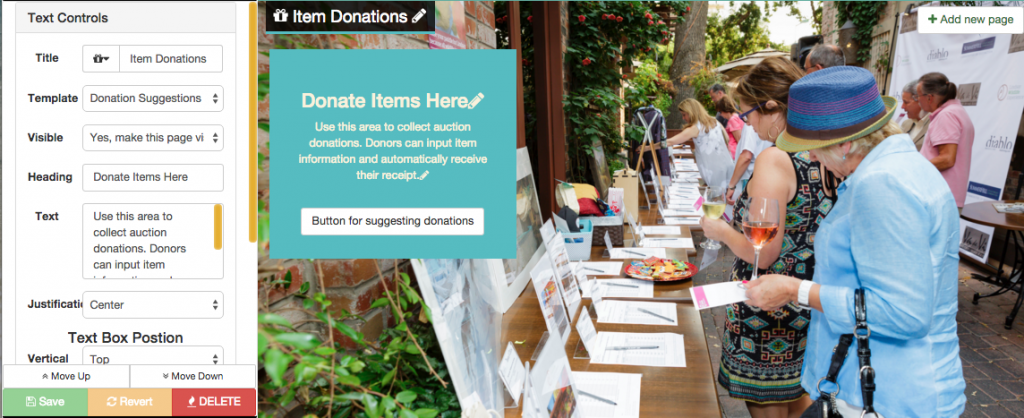
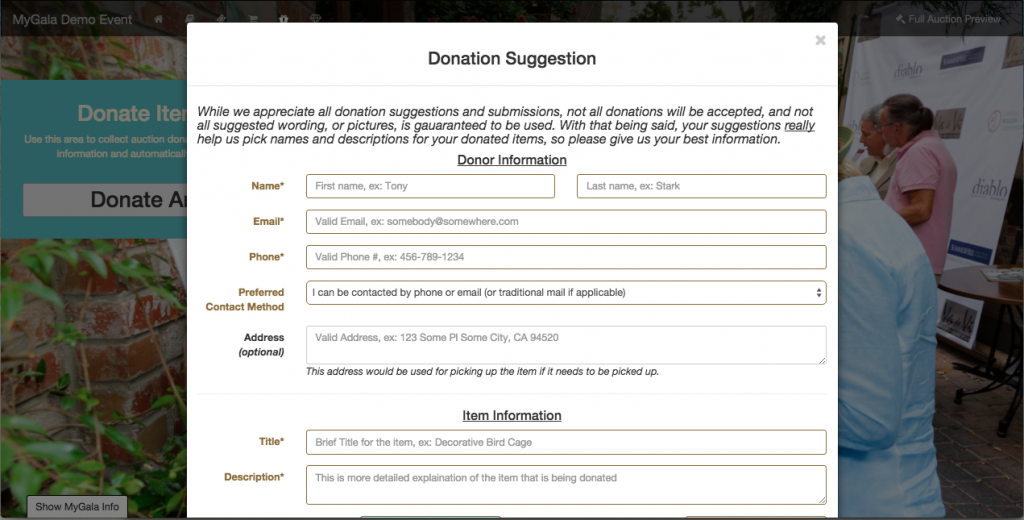
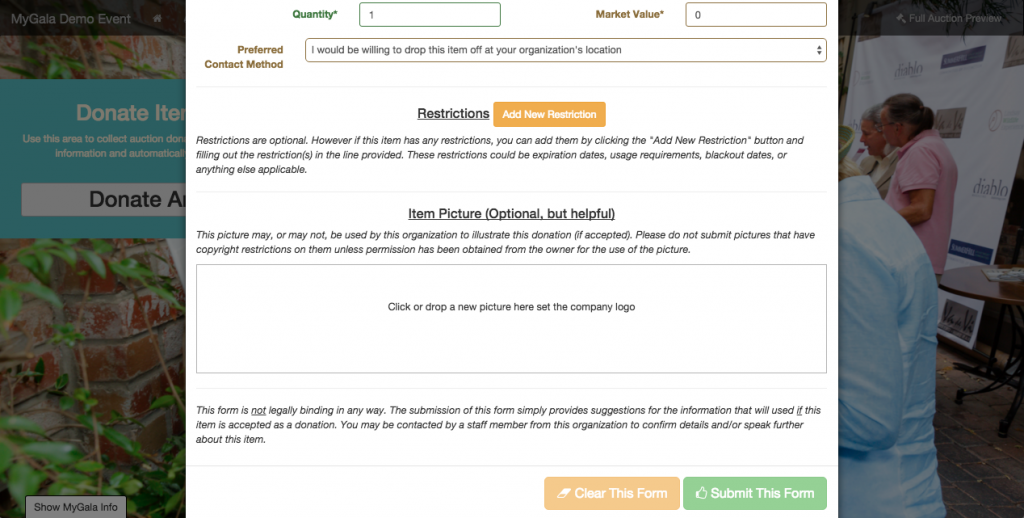
    Donation Suggestions – this section allows you to solicit auction donations from your event landing page. MyGala provides this feature at no extra charge. To use this feature you will need to edit your donation thank you email template on the admin areaWhen you select this template, we will automatically add a button that allows guests to fill out their item and donor information, upload a picture of the item, and add any restrictions on the donation. After submitting a donation, they will receive a confirmation email. Remember to add a title, select an icon, and add custom text to the page to encourage donations.
    Donation Suggestions 

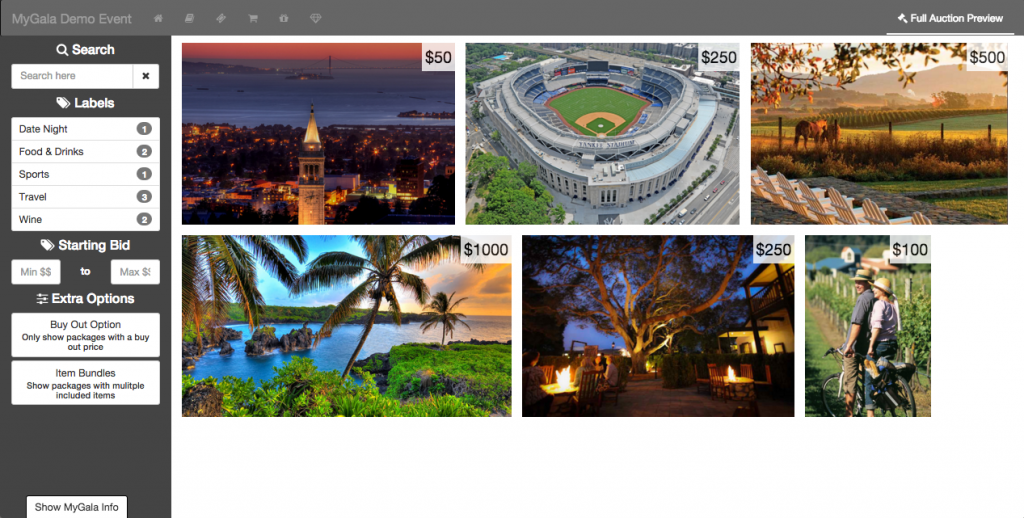
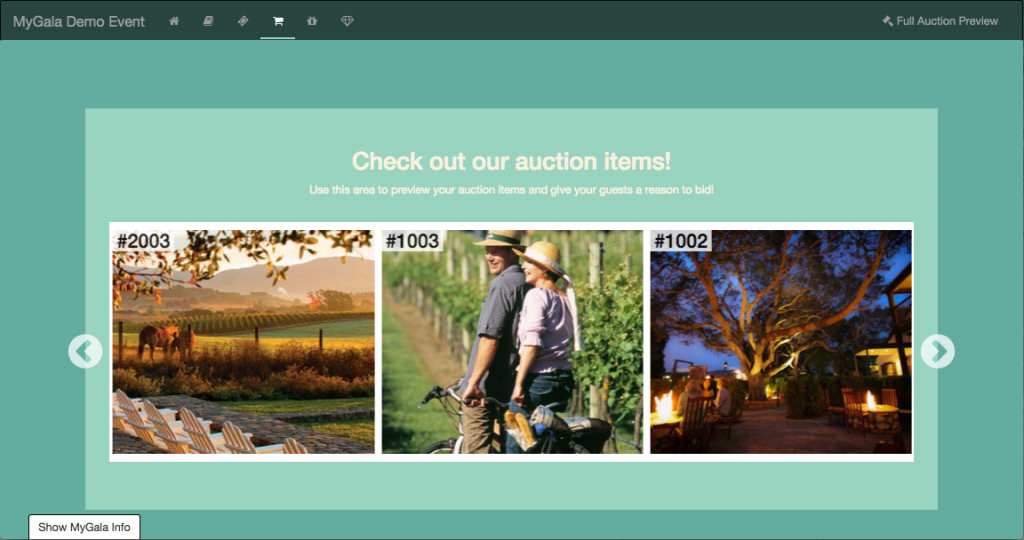
    Auction Sneak Peek – this section allows your guests to preview the auction items available at your event. We provide a slider on this section that previews any featured packages, as well as a link to take them to the auction preview page. We recommend making this page invisible to the public until you have several packages listed on MyGala along with images to provide the best possible preview. You can view a sample auction preview page on MyGala’s demo event.
    **Note: If you do not provide an image for your package, MyGala will provide a filler image.**
    Auction Preview Area 

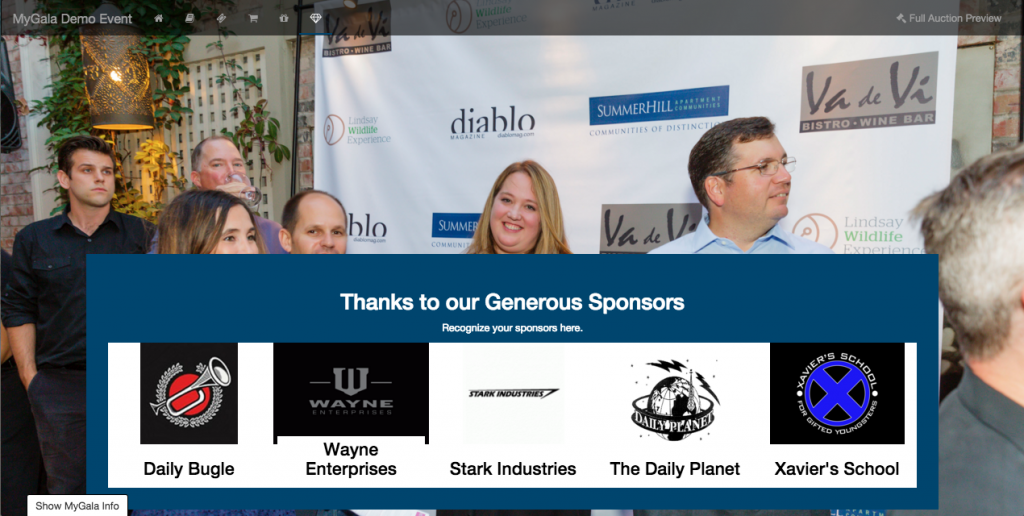
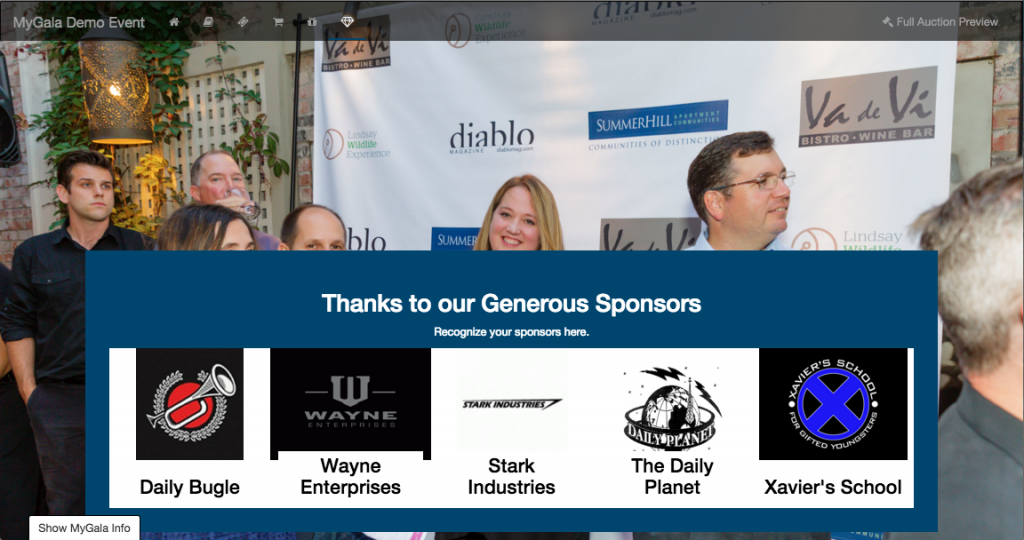
    Sponsor Spotlight – this section allows your organization to highlight the event’s sponsors. We provide a slider on this section that displays sponsor logos. We recommend making this page invisible to the public until you have added a sponsor to your MyGala admin area and uploaded a logo.
    Screen Shot 2016-01-01 at 1.08.28 PMRegular Page – this template is a basic text box. Using this template, you can provide your guests with helpful event information, such as special parking instructions, an explanation of the dress code, a preview of your paddle raise, a description of your organization’s mission and programs, or anything else you’d like to include.
    Regular Page

We are constantly adding new templates and user controls to your MyGala event landing page to help make this page exactly what you want. We look forward to your feedback and invite you to contact us if you have any questions or suggestions. If you missed our first tutorial, be sure to check out Getting Started with MyGala. Next up, we’ll delve into ticket purchases in further detail.

MG Dashboard 2

Tutorial: Getting Started with MyGala

You’ve decided to make your auction event easier than ever and purchased MyGala for your next fundraising auction, now what? All of our MyGala packages include training sessions for your organizational users and volunteers, but if you’re chomping at the bit to get started, this tutorial will cover the first steps in using MyGala. We want to help you succeed, so please contact us with any questions or to schedule your training session!

    1. Confirm event details
      When we set up your event, we’ll add your event details. To get started, confirm that your event details are correct. From your MyGala admin page, hover over “Event” and then click on “Event details.” You can change your event name, starting time, and even the contact email. If you need to change the date of your event, please contact us to make that change.Event Details Page
    2. Add organizational users
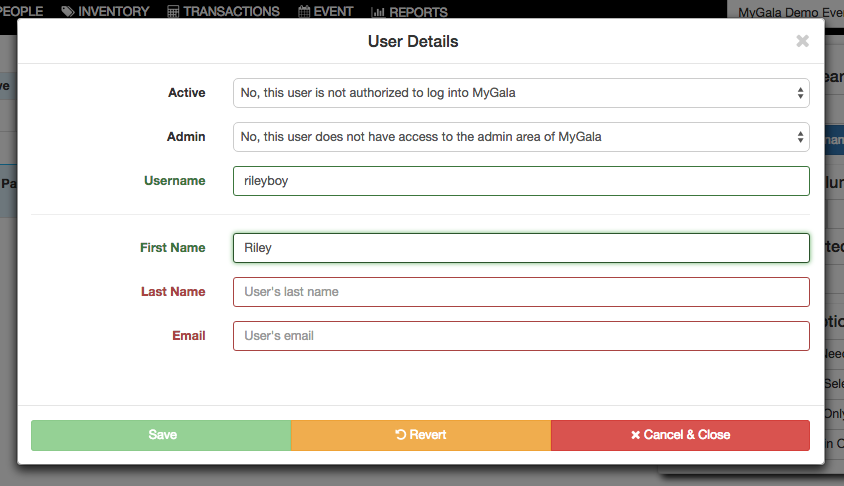
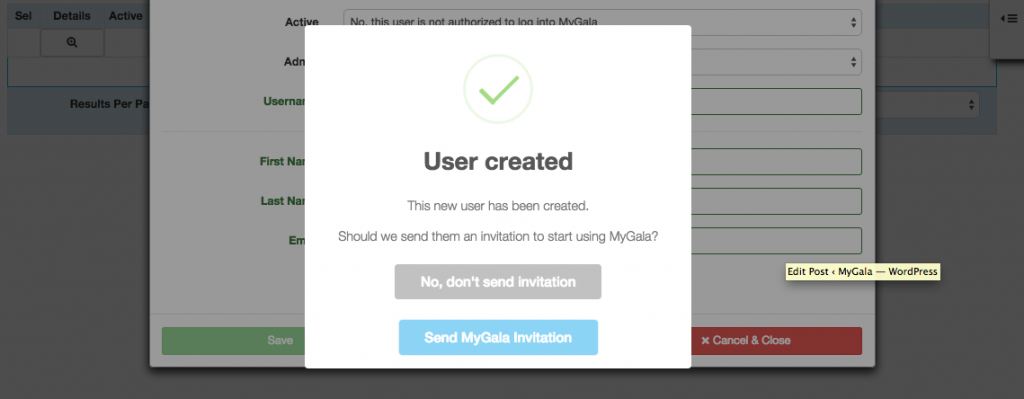
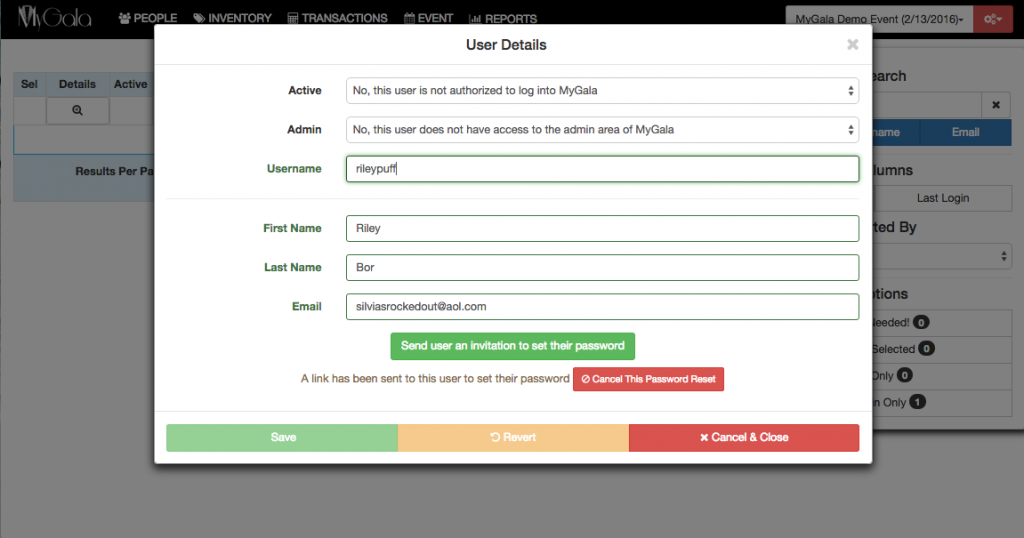
      You can add new users for your organization through your MyGala admin page. From the settings area on the upper right corner, click on “Organization Users.”Settings TabFrom the Organization Users section, click on “Click to add new user.” To create a new user, you need to fill out their first and last name, and provide an email address. From there, you can make them an active MyGala user, assign their access level (admin access or volunteer without access to the admin area), and assign a user name.Screen Shot 2016-01-01 at 1.29.39 PMAfter you save, a pop-up will come up asking if you want to invite this person to use MyGala now. Click yes to send them their invitation. They will then receive an invitation from MyGala asking them to set their password and log into the system. Click no if you would rather wait until a later time to grant them access. For example, if you want to add all your volunteers to the system as you recruit them, you can create new inactive users, and wait until you’re closer to the event date to grant them access so that they don’t accidentally change anything in the volunteer area before they should.

      New User Invitation Request

      If the user does not receive the invitation email or you would like to send the invitation at a later date, you can re-send it from their user details (simply click on the microscope with the + sign under the “Details” column, next to their name). You can also cancel the invitation if you sent it in error. This is the same place where you can help them reset their password if needed.

      User details

    3. Add tickets to your event
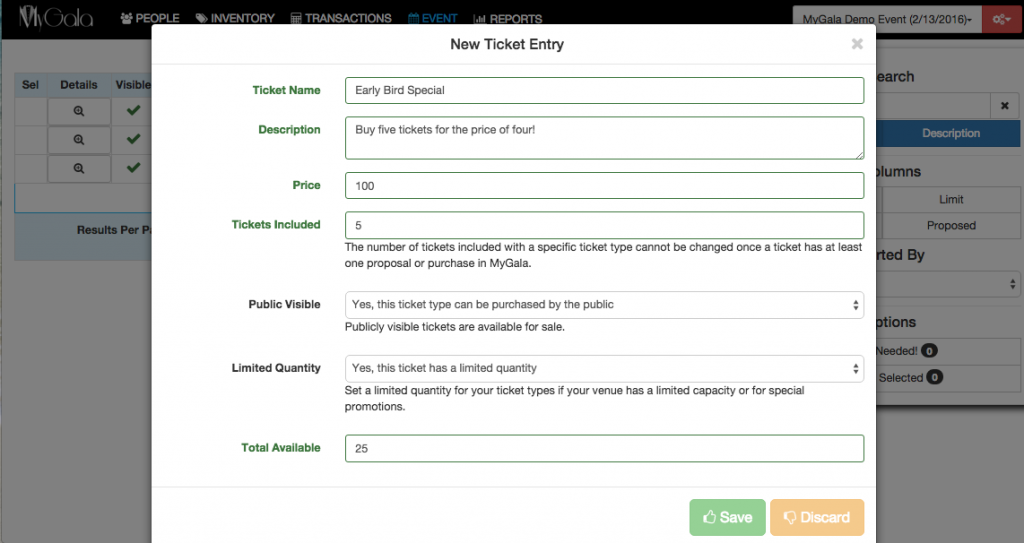
      If you’re selling tickets using MyGala (one of our new features), or if you have multiple ticket types for your event, your next step will be to add tickets to your event. Under the “Event” tab in the Admin area, click on “Tickets.” Click on “Click to Add New Ticket” and fill out the information requested. You’ll need to know a ticket name, ticket description, price, and the number of tickets included. For example, let’s say you’re selling a ticket bundle that includes five tickets for the price of four at $100. You would name the bundle, put those details in the description, set the price at $100, and the number of tickets included at 5. After you’ve entered your ticket information, you can select whether to make the ticket publicly visible or to display a limited quantity. For example, if you are selling early bird tickets at a special price, you would make the ticket publicly visible at first. After the end date, you could return to the MyGala admin area and change the visibility to “hidden.” Another way to do this would be to limit the number of tickets available. For example, if you only want to sell discounted tickets for the first 25 buyers, then you would set the quantity available to 25 and the ticket type would automatically disappear from public view after the 25 tickets were purchased.Sample ticket type
    4. Add event meals
      If you’ll be offering different meal options with your tickets, you should add the meal choices to your event for guests to select their option. You can do so from the “Event” tab in the Admin area under “Meals.” From there, fill out your first meal choice. Under “What do you call this meal choice,” fill out the name of the option e.g. Prime Rib. You can then add a brief description to help guests make a better decision. If you have a limited number of meal choices, you can specify under the available line. Finally, select whether the meal choice will be visible to your guests during ticket sales or not. After you click “Save,” you can scroll down and enter a new meal option. We recommend including an option for dietary restrictions or food allergies.Meal Choices
    5. Edit email templates
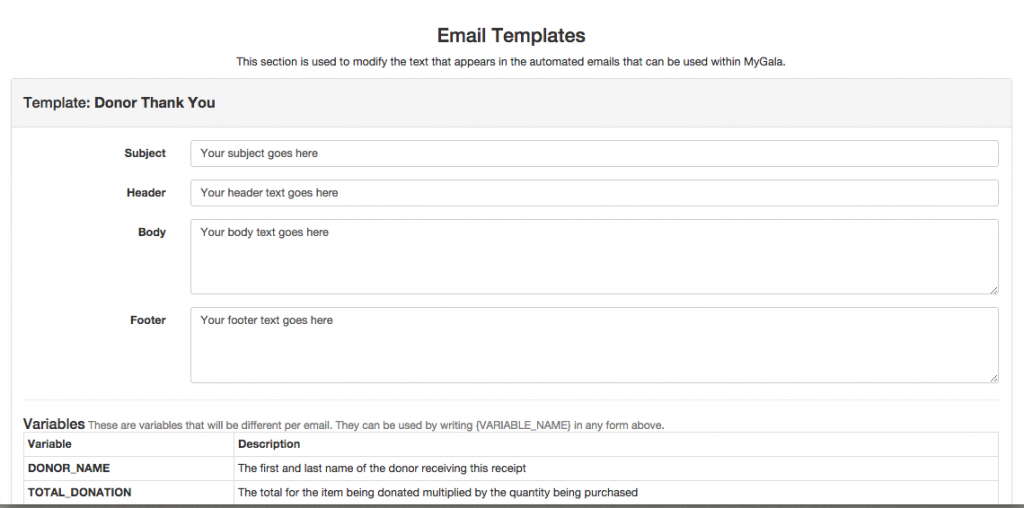
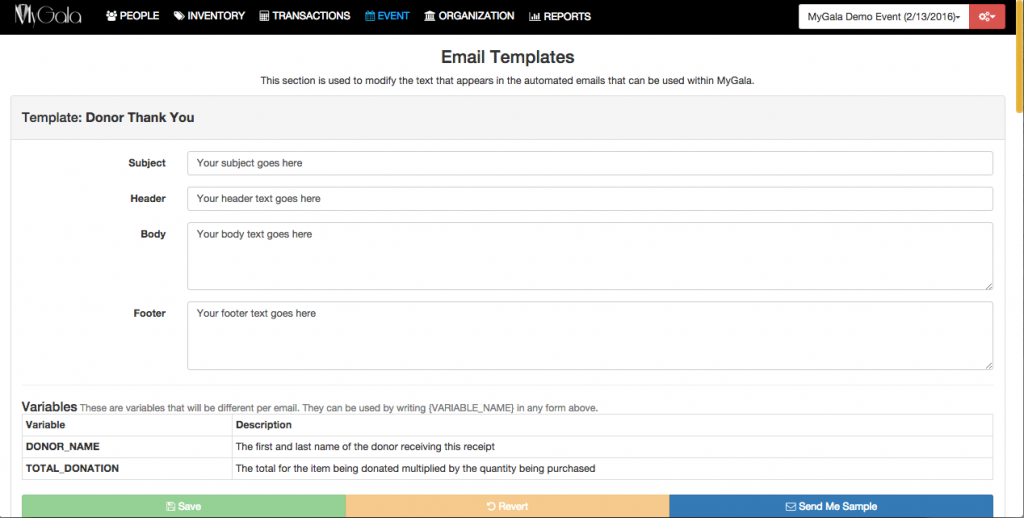
      MyGala allows you to edit and customize the emails your guests receive from MyGala. We currently have five editable templates. You can access these from the “Event” tab in the Admin area. Click on “Emails.” You can edit the subject line, the header text, the body text, and footer text. All of your emails will include your organization’s logo and default text displayed in the “Emails” area. You can also personalize the emails with the contact name, the value of donations, or other variables listed. For example, the variable “Donor_Name” will insert the donor’s name within your email, wherever it is inserted. The following are brief descriptions of each of the email templates.Email templatesDonor Thank You – will thank your auction item donors for their donation. This email is automatically sent to your donors when they submit a donation using the auction donation form on your event landing page. You can also send this email manually through the donors area.Donor Buyer Info – will send an email to your auction item donors with the name and contact information of the person who bought their donation. This is an especially handy email for those donors that request contact information. For example, some people that donate a gift certificate for their services may want to follow up directly with the buyer so that the gift certificate will be used. This email will be sent manually by you to those donors that wish to have purchaser contact information via the donors area.Purchase Receipt – will thank your event guests for their purchases on the night of the event. This email is automatically sent to your guests when they check out at the end of the night. You can also send this email manually through the transactions area.

      Ticket Purchase Receipt – will thank your event guests for their online ticket purchases on MyGala. This email is automatically sent to your guests when they submit a ticket purchase using the form on your event landing page.

      Sponsor Thank You – will thank your sponsors for their sponsorship of the event. This email will be sent manually by you via the sponsors section on the admin area.

    6. Set up your event landing page
      Lastly, you will set up your event landing page. You can do this in the “Event” tab on the Admin area. Click on “Landing Pages.” We will cover your landing page set-up in further detail in our next blog post, but for now, we’ll cover the basics. From here, your home page will be visible and ready for editing. You can edit your heading text, your main text, and the look of the page. Modifications include changing the location of the text box, the background image or color, and your text color. You can also use a specific template, such as donation suggestions, which will automatically add the auction donation submission form to that particular section of your landing page. To add a new section, you can click “+Add New Page” from the top right corner of the screen. You can also choose to make each section publicly visible or not.Event landing page set-up

Well, we’ve covered all the basics in this post. Stay tuned for future tutorials and for video tutorials, which will cover each section in more depth. We want to make your experience as easy as possible, so please contact us with your questions or suggestions!

Screen Shot 2015-12-16 at 6.09.58 PM

MyGala v0.3 Walkthrough: Part 3 of 3

We hope you all enjoyed a very merry Christmas! And now, the long awaited part 3, the final blog post in our MyGala v0.3 walk-through to close out the year. This blog post is a full tour of our new event landing pages that can help your organization better promote its fundraising auction event to make more money for your school or non-profit!

In part 2 of the MyGala walkthrough, we talked about packaging items into sellable packages, sponsor management, event management, email templates, and the volunteer area.

The Event Landing Page

New Look and Easy Interface

Screen Shot 2015-12-16 at 6.09.40 PM

The new event landing page is customizable to suit your non-profit or event’s branding. With full-screen image backgrounds, you can display your event in the best possible way. We’ve included pre-set templates that let you post ticket sales, collect auction donations, and highlight your sponsors with minimal effort. Your landing page can include as many sections as you’d like and include all the important information your guests will need.

Screen Shot 2015-12-16 at 6.17.33 PM

We’ve also streamlined the auction preview area to display your auction items in a beautiful collage.

Screen Shot 2015-12-16 at 6.13.38 PM

The editing panel lets you preview the landing page as you change background colors or images, text, and template style. You can also change the location of the text box within each section to best fit your background image, as well as the text alignment within the text box itself.

Built-in Ticket Sales

Screen Shot 2015-12-16 at 6.09.58 PM

The built-in ticket sales module lets you sell tickets to your event with no added fees*. Payments are processed using your organization’s PayPal account so you can trust where your proceeds are going and that your donor information is secure. You can sell as many different ticket types as you’d like, including early-bird pricing specials, multi-ticket discounts, sponsored tables, or tickets to different portions of the evening. MyGala’s in-app ticket sales let you collect guest information and preferences quickly and easily. You’ll have access to buyer information to make follow-ups easier, and there will be no need to sync your guest list with an external ticket provider.

*We don’t charge any additional fees, but PayPal is still subject to payment processing fees. Please visit their website for more information.

Auction Donations

Screen Shot 2015-12-16 at 6.10.15 PM Screen Shot 2015-12-16 at 6.10.55 PM

If you’re tired of entering items manually, our new auction donations module lets you collect donor and item information online, while syncing with MyGala. Donors can submit item details and pictures of the donated items. Once you’ve approved the donation, you can quickly combine donations as sellable packages.

Sponsor Spotlight

Screen Shot 2015-12-16 at 6.13.16 PM

With the new sponsor spotlight section, you can recognize your event sponsors with a logo or text label. This section can be used as an added sponsor perk to promote their philanthropy, helping you increase event sponsorships.

Check out our new event landing page for yourself! We’ve created a demo event landing page that lets you see what our different modules look like and how your customized pages could look like.

We hope you enjoyed our walk-through of the new MyGala! In case you missed it, check out our guided tour of the new MyGala on our homepage, Part 1 of our walkthrough, or Part 2 of our walkthrough. If you want to see for yourself how MyGala can help you raise more money with your auction event, contact us to schedule a free demo of MyGala!

Screen Shot 2015-12-14 at 5.41.25 PM

MyGala v0.3 Walkthrough: Part 2 of 3

Welcome to part 2 of our MyGala v0.3 walk-through. We’ve added some amazing new features that make it easier than ever to plan a fundraising auction and make even more money for your school or non-profit!

In part 1 of the MyGala walkthrough, we talked about the MyGala dashboard, Master contact and company lists, and the event guest list.

The New Admin Area… continued

Auction Items and Packages

Screen Shot 2015-12-14 at 4.15.15 PM
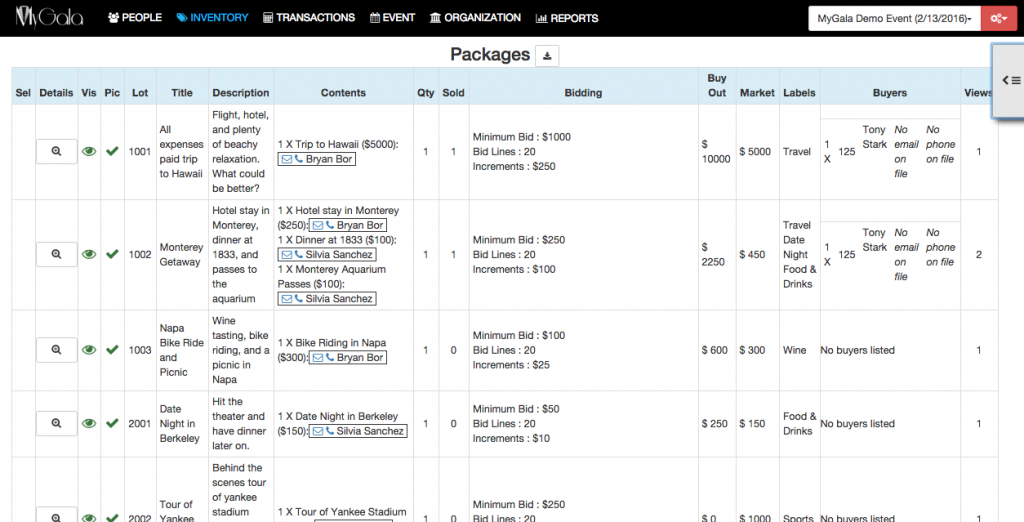
The new MyGala interface gives you more item and package information at a glance. You can view and add donation restrictions, such as expiration dates and terms of use. All your donor information is visible from the item module, as well as from the package module. You can send email thank yous to your item donors with the click of a button or solicit donations from past donors. Your packages can now have multiple pictures, which lets your guests get a better idea of the items they’ll be bidding on at your event.

Event Sponsors

Screen Shot 2015-12-14 at 5.17.12 PM
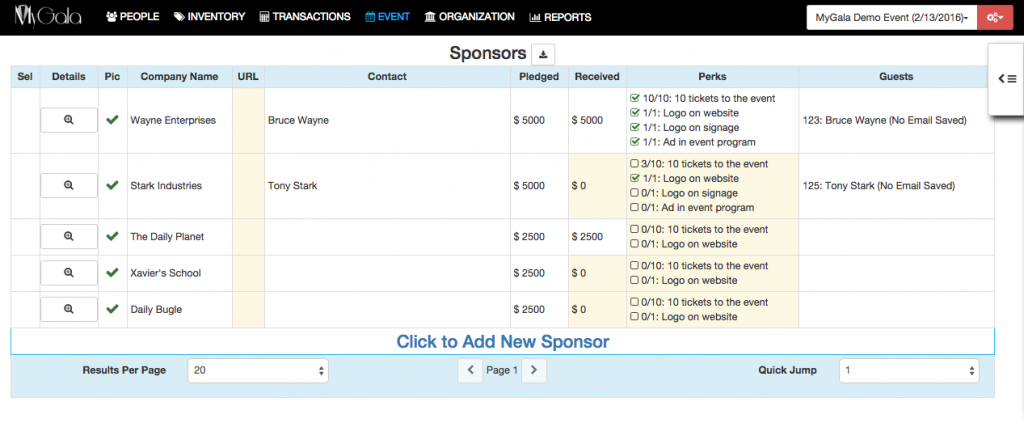
Keep track of your event sponsors with the dedicated sponsors module. This section lets your keep track of your sponsor pledges and payments and more. Add any perks you’d like to keep track of and you can ensure all your sponsors get everything they’ve been promised. You can include a URL and logo for each of your sponsors, and set primary contacts for your records.

Event Management

Screen Shot 2015-12-14 at 5.34.33 PM
We’ve made it easier to manage all your event details, such as meal choices, ticket types, and event landing page. For those events that offer different types of tickets, such as early-bird pricing or tickets for a cocktail reception or VIP lounge, the new tickets area helps you limit purchases and set pricing. The event landing page module lets you create and edit your event landing page with a live preview alongside the edits panel.

Screen Shot 2015-12-14 at 5.34.56 PM

Email Templates

Screen Shot 2015-12-14 at 5.39.22 PM
We’ve also added an email templates section where you can modify each email that your guests receive, including thank you emails to your auction donors and ticket/ auction purchasers, auction item solicitations, and event marketing.

The New Volunteer Area

Streamlined Look

The new volunteer area has been updated to make it easier than ever for your volunteers to check guests in, enter auction purchases, check guests out, and manage item pick-ups.
Screen Shot 2015-12-14 at 5.41.25 PM

Screen Shot 2015-12-14 at 5.41.51 PM

Screen Shot 2015-12-14 at 5.42.11 PM

Screen Shot 2015-12-14 at 5.42.37 PM

Lastly we’re going to show you a detailed walk-through of the Event Landing Page, so stay tuned for Part 3. In the meantime, check out our guided tour of the new MyGala on our homepage or Part 1 of our walkthrough. If you’re feeling extra anxious to get a sneak peek, contact us to schedule a free demo of MyGala!

Screen Shot 2015-11-27 at 5.03.37 PM

MyGala v0.3 Walkthrough: Part 1 of 3

In this three part walk-through, we’re going to talk about some of the new features we added to MyGala v0.3 in detail. We’ve made it easier than ever to plan your auction events and keep track of everything from guest transactions to sponsor perks.

The New Admin Area

MyGala Dashboard

MG Dashboard 2

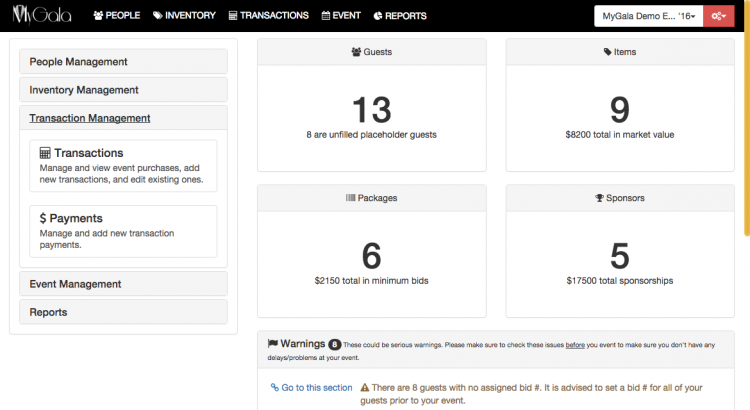
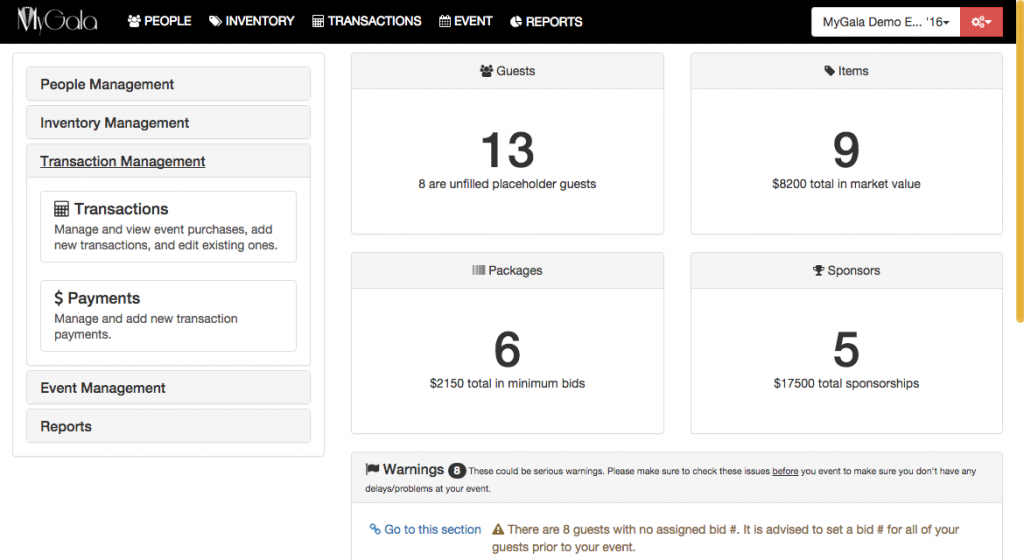
We’ll start with the first screen you see. As you log into your admin area, the first screen is a new and improved dashboard. At the top is a heads up display with important stats for your event: number of guests attending, donated items, sellable packages, and sponsors. The subheading to these numbers provides more detailed information, such as the number of placeholder guests attending, i.e. guests of guests that don’t have names or contact information filled in yet. Below the heads up display is a list of warnings. These might include missing bid numbers, unfulfilled sponsor pledges, items missing donor information, and guests missing contact information. Below this section is a MyGala tips area that provides helpful hints as you plan your event. Lastly, the dashboard has a detailed description of each of the sections in your admin area to the left, to help you navigate.

Master Contact and Company List

Screen Shot 2015-11-27 at 4.37.24 PM

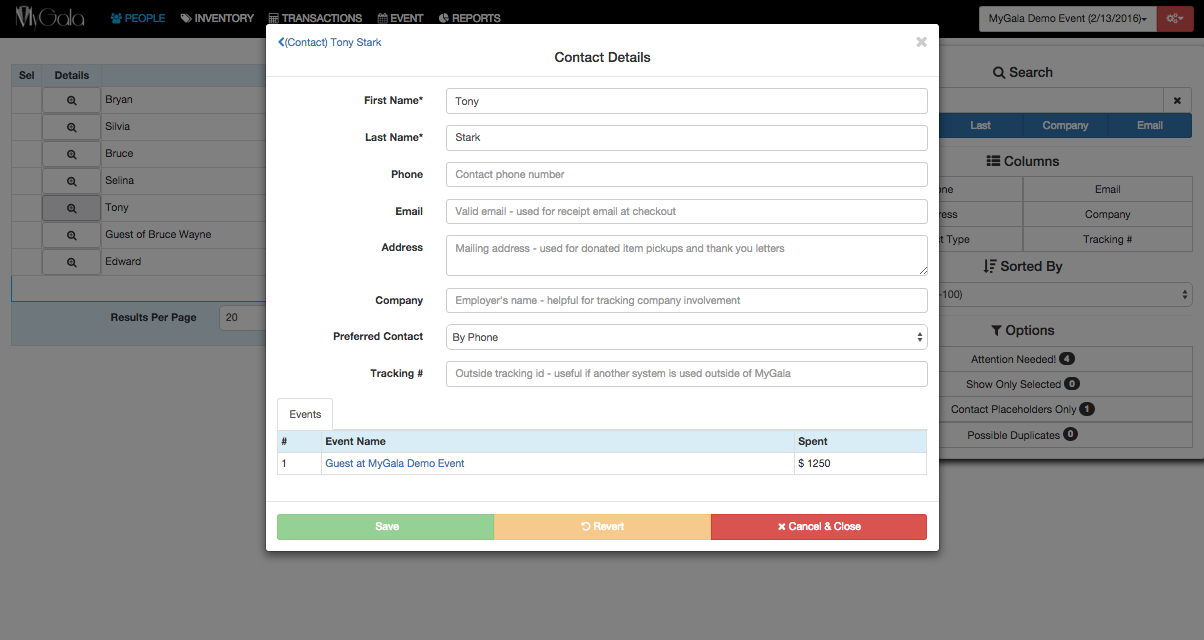
For those of you familiar with MyGala, you know that we’ve always kept a list of your event’s guests. The new version includes the event’s guest list, as well as a master contact list and a master company list accessible from any event. This new feature allows you to keep track of all contacts associated with your organization’s fundraising events and includes a detailed breakdown of their participation at each event (attendance, purchase amount, sponsorships, item donations, etc.). Overall, the master contact list means that you do not need to collect contact information from your guests, donors, or sponsor contacts if they have participated in any of your past events because their information will already be stored in MyGala.

Screen Shot 2015-11-27 at 4.57.11 PM

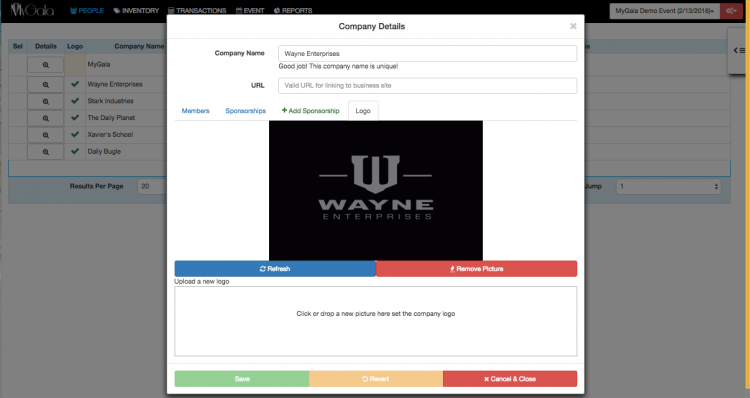
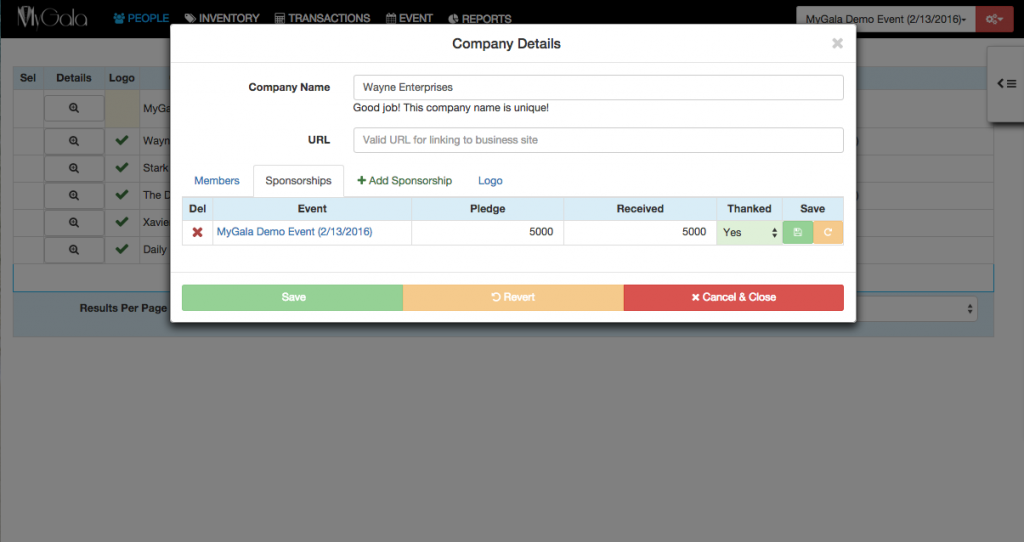
Likewise, the master company list helps you track all companies that have participated in your organization’s events. It is accessible from every event and you can add or edit company contacts, add a logo, and view their participation history.

Event Guest List

Screen Shot 2015-11-27 at 4.52.42 PM
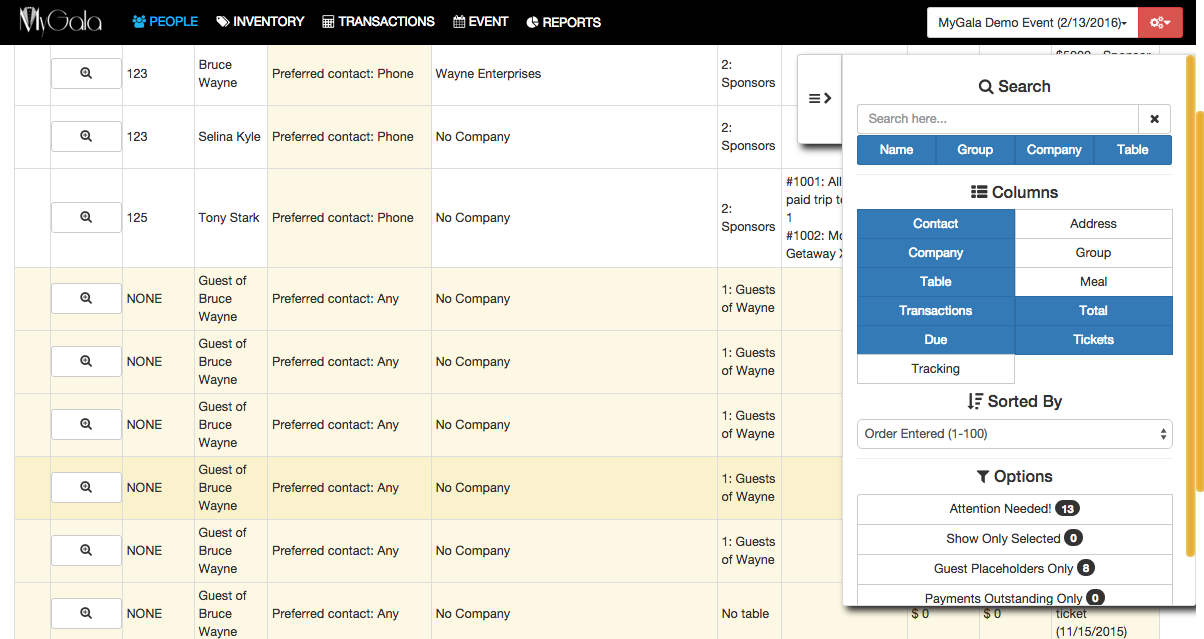
We kept all the features consistent and included more information in the guest module. The main page is customizable to include the information you need at any moment in time. For example, you can view contact information only and hide the remaining columns. If you want to view a guest’s activity at an event, you can choose to view only the columns with the evening’s transactions and the amount spent.

We’ve got a lot more to show you, so stay tuned for Part 2. In the meantime, check out our guided tour of the new MyGala on our homepage. If you’re feeling extra anxious to get a sneak peek, contact us to schedule a free demo of MyGala!